Understanding the My Requests Page
You use the My Requests page to make requests. This topic reviews the features of the My Requests page. See the following topics for more information about requests and the My Requests page:
Tools in the Title Row
There are four tools available in the title row of the My Requests page:
- The Printable View button
- The Profile menu
- The Filter menu
- The Refresh View button
The Printable View Button
Clicking the Printable View button opens a printable view of the My Requests page's current state in separate window.
The button changes depending on whether the page is in Calendar view or Weekly view.

|

|
| The Printable View button in Calendar view |
The Printable View button in Weekly view |
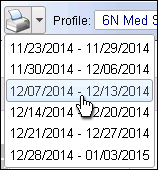
In Weekly view, the My Requests Printable View icon has a menu, signified by the black down arrow. Click the icon and select the week you want to print, as shown in the following illustration.
Profile Menu
If you can make requests in other profiles, you can use the Profile menu to change the profile in view. You can make requests in other profiles when you have a secondary job, when you have permission to make float requests to other profiles, or when you have a pending future transfer to another profile. In those cases, the Profile menu includes:
- Your Primary Profile (also known as your Home profile)
- Your Secondary Profile (if you have a secondary job in another profile)
- Your available Float Profiles (if you have permission to float to one or more additional profiles)
- Your Future Transfer Profile
Filter Menu
If you have set up filters, you can select a filter from the Filter menu to limit the data displayed on the My Requests Page. If you are using Internet Explorer, you also have a Setup button available for you to create a filter. If you are using another browser, you can still select available filters from the menu, but the Setup button is not available. See Using Filters for more information.
Refresh View Button
Clicking the Refresh View  reloads the Request Sidebar and the Schedule Grid. Clicking Refresh View also clears any selections you may have made when reloading the page. If you have any unsaved changes, Clairvia Web first displays a warning message. Clicking OK continues with refresh, while clicking Cancel dismisses the warning message and cancels the refresh. You can then save your changes.
If there are any windows open, such as Request Date Details, Project Paid Hours, or Skill Coverage, clicking Refresh View closes them all.
The View Toolbar
As its name implies, the View toolbar lets you control the views displayed on the My Requests page. The page always contains six weeks of information, but you control how that data displays.

The Weekly and Calendar View Buttons
The Weekly view displays the six weeks of data horizontally. You can scroll from left to right to see the entire period. Show Needs is an optional feature of the Weekly View by Task. It shows you where the schedule needs more staff members. You can then make requests that managers are more likely to approve. You open the Weekly view by clicking Weekly in the View toolbar.
The Calendar view is the default view for the My Requests page, and it displays the six weeks of data in a calendar grid. If there are more assignments than can be displayed within one calendar cell, the bottom of the cell displays a Details link. You can click the Details link to open a window displaying all the schedule information for that date. If you have changed to the Weekly view, you can open the Calendar view by clicking Calendar in the View toolbar.
View by Employee and View by Task Buttons
The View By buttons, Employee and Task, work with the Weekly and Calendar view buttons to control how the My Requests page displays information. Clicking Employee sorts the schedule data alphabetically by employee last name, followed by the assigned or requested task. Clicking Task sorts the schedule data by task in task display order, set by the scheduler, followed by the employee's name.
If your organization has configured the Employee label, the Task label, or both, the Employee and Task buttons display your organization's preferred label, such as Provider and Shift If the configured label is longer than 15 characters, the button displays the first 12 characters, followed by an ellipsis (...), as in Neuroendocri... for Neuroendocrinoligists.
The Show Menu
The Show menu has three options that let you limit the data displayed on the My Requests page.
- Show Only Requests: Select this option to remove schedule data and displays only requests.
- Show Only My Schedule: This option is selected by default; it hides the data for other employees so you can see just your schedule and requests. If you want to see the schedule of other employees, deselect this option. If this option is disabled and you cannot deselect it, your manager has restricted the ability to view other employee schedules.
- Show Needs: An optional feature of the My Requests page in Weekly by Task view only, this shows you where more staff members are needed in the schedule, highlighted in yellow. You only see this option if your organization has configured this option. If your organization is not using Show Needs, the option is not available and you are not able to view staffing needs.
If both Show Only Requests and Show Only My Schedule are selected, the page displays only your requests.
The Projected Paid Hours Link
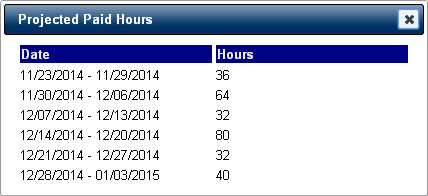
Clicking the Projected Paid Hours link opens the Projected Paid Hours table. The Projected Paid Hours table keeps track of your scheduled hours and the hours associated with any approved or pending requests not already on the schedule. Paid hours include both worked hours and paid time off for each of the six weeks of schedule data on the page. The Projected Paid Hours table display totals for each of these weeks.
Skill Coverage
Clicking the Skill Coverage link opens the Skill Coverage window. The Skill Coverage window displays the coverage count for your skill or skills during a selected week for your skill only. If you have multiple skills, the window sorts coverage counts first by skill, then by shift category partition, so that the window displays the coverage counts for each of your skills together.
The window displays days that are over- and understaffed, letting you select the best days to make requests. Managers are more like to approve a request to work a task on an understaffed day or a request for time off on an overstaffed day.
The Skill Coverage window remains in the foreground as you scroll through the current view, so that the coverage information is always visible. The coverage counts include all scheduled tasks and approved requests. The table also includes pending requests if you select the Include Pending Requests option.
Coverage calculations are displayed in, or rounded to, the hundredth decimal point when applicable. The displays are color-coded depending on how the values compare to the staffing set in the Staff Manager Client Workload Planner. If there is no Workload Planner data available, the table compares coverage against the profile's core coverage data.
- Coverage counts in black indicates that coverage matches plan
- Coverage counts in red indicates overstaffing compared to plan
- Coverage counts in blue indicates understaffing compared to plan
The Skills Coverage window has a Week menu in the upper-left corner that displays the first week of the current view. You can select a different week from the Week menu to see its skill coverage information.

If your profile does not use defined skills, opening the Skill Coverage window displays the message: Skill Coverage data is not available.
The Date Navigation Bar
The My Requests page Date Navigation Bar controls the dates displayed in the Schedule Grid. The Date Navigation Bar has four options:
- The Previous Period button: Changes the view to the start of the previous period. Administrators define the number of weeks in each profile period in Staff Manager Administrator. The period definition aligns to the standard length of each schedule by profile.
- The Go to Period menu: Allows you to select from eight periods (the current period and the next seven).
- The Calendar button: Opens a calendar that you can use to select a new date.
- The Next Period button: Changes the view to the start of the next period.
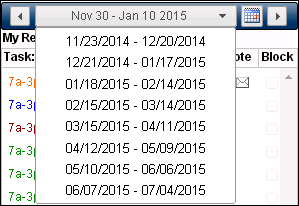
The preceding illustration shows the Date Navigation Bar with the Go to Period menu open.
My Requests Page Content
The My Requests page content is divided into two areas: The Request Sidebar and the Schedule Grid. What you see in the Request Sidebar depends on what you have selected in the Schedule Grid.
If you have nothing selected, or if you select a request, the Request Sidebar displays the following panes:
- The My Requests Pane: This pane displays any requests you have in your currently selected date range. If there is a note associated with the request, a note icon displays in the Note column. If your profile has configured Block requests, the Block column is included in the pane and displays a selected check box beside each Block request.
- The Request Details Pane: This pane displays the information for that request.
If you are making a request in Calendar view, the Request Sidebar displays the following panes:
- Select Dates: This pane displays the date you have selected in the Schedule Grid.
- Select Tasks: You use this pane to select the task you want to request on your selected date.
Once you have selected a date and task combination in Calendar view, the Request Sidebar displays the following panes:
- Submit Requests: This pane displays the date and task combinations you have selected.
- Note to Scheduler: You use this pane to attach a note to your request.
If you are making a request in Weekly view, the Request Sidebar displays the following panes:
- Submit Requests: This pane displays the date and task combinations you have selected.
- Note to Scheduler: You use this pane to attach a note to your request.
The following illustrations review the different features and information displayed on the My Requests page in various views. In each illustration, the view is by Task; however, the Employee views are very similar.
Calendar View by Task (Nothing Selected)
- The Date Navigation Bar, as described in The Date Navigation Bar section above.
- The My Requests pane. Requests are coded based on their status.
- The Note column of the My Requests pane with a Note to the Scheduler attached.
- The Block column. If your profile uses the optional Block Request feature, a selected check box indicates a Block request.
- The Schedule Grid.
- A pale green bar indicates an approved request for another employee.
- A pale gray bar indicates a scheduled task for another employee.
- A dark gray bar with white text indicates one of your scheduled tasks.
- An orange bar with white text indicates one of your wait listed requests.
- A dark blue bar with white text indicates one of your pending requests.
- The Request Details pane. When you have selected a request, its details display here.
- The action buttons. Depending on what you are doing on the page, the names of these buttons change.
- If you have nothing selected, or if you have a pending or wait listed request selected, the buttons read Clear, Edit, and Delete.
- If you select an approved or denied request, only the Clear button is available; Edit and Delete are disabled.
- If you select a calendar cell and a task, the buttons read Clear, Remove, and Select. If you click Select, the buttons change to Back, Remove, and Save.
- A pale red bar indicates a denied request for another employee.
- A pale blue bar indicates a pending request for another employee.
- A dark green bar with white text indicates one of your approved requests.
- The Details link displays whenever the available schedule information cannot fit within the calendar cell. Clicking this link opens the Request Date Details window.
Weekly View by Task (Nothing Selected)
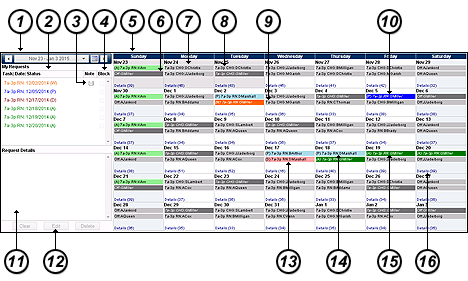
Note that scheduled tasks and requests follow the same color codes as in the My Request page in Calendar view.
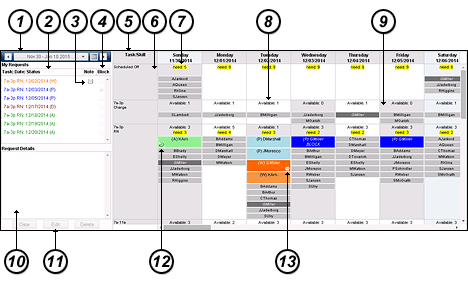
- The Date Navigation Bar, as described in The Date Navigation Bar section above.
- The My Requests pane. Requests are coded based on their status.
- The Note column of the My Requests pane with a Note to the Scheduler attached.
- The Block column. If your profile uses the optional Block Request feature, a selected check box indicates a Block request.
- The Schedule Grid.
- The Task/Skill or Employee column. This column reads Task/Skill when you have selected Weekly View by Task and Employee when you have selected Weekly View by Employee. The following columns are the dates for the six weeks in your current view. You do have to scroll right to see all dates in Weekly view.
- The staffing needs for this date and task, highlighted in yellow.
- Available: Administrators can limit the number of requests that are accepted on a per task basis. If a task has a request limit, the cell shows the number of requests still available. The application updates this number as people make requests or are scheduled to the task. In this example, there is one request slot still available.
- An unavailable task: In the Weekly by Task view, a task unavailable for requests due to a request limit appears disabled (gray). You can click on the cell, but Staff Manager does not allow you to select it.
- The Request Details pane; when you have selected a request, its details display here.
- The action buttons. Depending on what you are doing on the page, the names of these buttons change.
- If you have nothing selected, or if you have a pending or wait listed request selected, the buttons read Clear, Edit, and Delete.
- If you select an approved or denied request, only the Clear button is available; Edit and Delete are disabled.
- If you select a calendar cell and task combination, the buttons read Reset, Remove, and Save.
- The Recurring Request icon
 indicates a recurring request.
- The Note icon indicates a note either to or from the scheduler. Notes to the scheduler have a white envelope icon:
 . Notes from the scheduler have a yellow envelope icon:
  .
.
Calendar View by Task: Selecting a Date and Task Combination
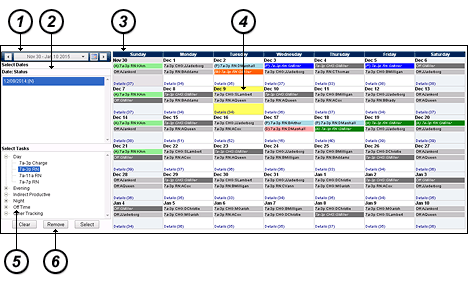
- The Date Navigation Bar, as described in The Date Navigation Bar section above.
- The Select Dates pane. It highlights your selected date in blue.
- The Schedule Grid.
- Your selected date, highlighted in yellow
- The Select Tasks pane. Use the Tasks tree to select the task you want to request.
- The action buttons: Clear, Remove, and Select.
- Clear removes all selections from the schedule grid and or the Request Sidebar.
- Remove removes any selected date or dates from the Select Tasks box.
- Select combines your date and task selections and updates the Request Sidebar to show the Submit Requests pane and the Note to Scheduler pane.
Calendar View by Task: Saving a Request
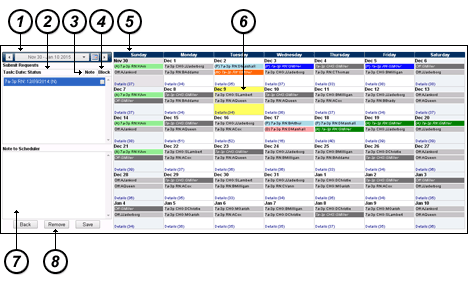
- The Date Navigation Bar, as described in The Date Navigation Bar section above.
- The Submit Requests pane. It highlights your selected date and task combination in blue.
- The Note column. If you have a note attached to this request, the Note icon appears here.
- The Block column. If your profile uses the optional Block request feature, you can select the check box at the end of the row to make this a Block request.
- The Schedule Grid.
- Your selected date, highlighted in yellow
- Note to Scheduler pane: You use this pane to attach a note to your request.
- The action buttons: Back, Remove, and Save.
- Back returns you to the previous view so you can edit your date and task selections.
- Remove clears the request.
- Save saves your changes and submits your request.
Weekly View by Task: Saving a Request
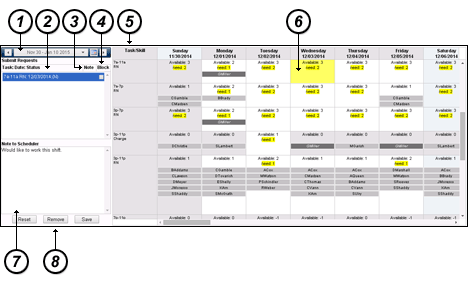
- The Date Navigation Bar, as described in The Date Navigation Bar section above.
- The Submit Requests pane. Your selected date and task combination is highlighted in blue. If your profile uses the optional Block request feature, the end of the row has a Block check box you can select.
- The Note column. If you have a note attached to this request, the Note icon appears here.
- The Block column. If your organization uses the optional Block request feature, you can select the check box at the end of the row to make this a Block request.
- The Schedule Grid.
- Your selected date and task combination, highlighted in yellow
- Note to Scheduler pane: You use this pane to attach a note to your request.
- The action buttons: Reset, Remove, and Save.
- Reset clears the page of all selections and returns it to its last saved state.
- Remove clears the request.
- Save saves your changes and submits your request.
More Information about the Request Details Pane
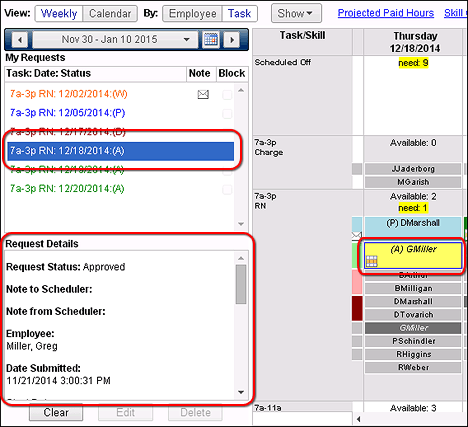
When you select a request, the My Requests page highlights the request in blue in the My Requests pane, highlights the request in yellow in the Schedule Grid, and displays the details in the Request Details pane, as illustrated below. Although the illustration shows a highlighted request in Weekly view by Task, the others views all display selected requests in the same way.
Note that the selected request is also a request for multiple days, as indicated by the multi-day request icon:  . This icon is only used in the Weekly view.
 Related Topics
![]()
 reloads the Request Sidebar and the Schedule Grid. Clicking Refresh View also clears any selections you may have made when reloading the page. If you have any unsaved changes, Clairvia Web first displays a warning message. Clicking OK continues with refresh, while clicking Cancel dismisses the warning message and cancels the refresh. You can then save your changes.


![]() . This icon is only used in the Weekly view.
. This icon is only used in the Weekly view.