The Patient Assignment Compliance Report was designed for organizations using Assignment Manager. The report allows you to:
Identify profiles where each patient is not being assigned the required caregivers.
Identify profiles where patient demand workload is not being met by the assigned caregivers.
The report uses the Caregiver Role Assignment configuration to find out if a profile has completed all required patient assignments. If you want to use this report, your profiles must be correctly configured to use Assignment Manager.
To check these settings, follow these steps.
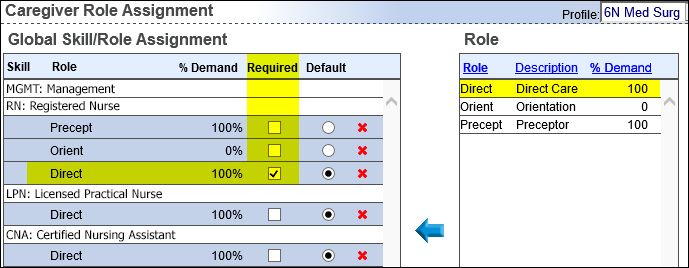
The following illustration displays caregiver role assignments for 6N MedSurg. For patients to be Fully Assigned, they must have caregivers who have the RN skill assigned in the Direct role for the entire shift.

The next illustration displays a patient who is fully assigned (indicated by the green circle and F under Asgn Status) and has had all demand hours met (indicated by Care Hrs of 0.00).

When the user positions their cursor over the Care Hrs value, a tooltip opens. The tooltip states that the CNA is providing 1.33 hours of direct patient care, the RN is providing 2.00 of direct care, and that there are no unassigned care hours. This patient has Fully Assigned Care Hours.

Complete the following steps to run the Patient Assignment Compliance report:
Select one or more Profiles. The menu only displays those Profiles associated with your selected Shift Category. As with facilities, Clairvia Web automatically limits the profiles to those set up for Assignment Manager and to which you have security access.

Note: Be aware that report formatting is not always retained when you export a report to Excel or CSV format. Opening a CSV file in Excel may change the format of the data. To view CSV files as they are exported from Clairvia Web, it is recommended that you open the file in a text editor application such as Notepad.
The first report option you select, Shift Category, displays a complete list of all Global Shift Categories as they are defined in Clairvia Web. Once you select a Shift Category, the Profile selection items are filtered down to include only Profiles within your selected Facility or Facilities that align to your selected Shift Category. This prevents users from selecting Profiles where the Shift Categories do not have the same partitions. For example, if a shift category with 12-hour partitions were selected and then a profile with 8-hour partitions were selected, the report output would inaccurately calculate the completeness of assignments on the 12-hour shift partitions.
If you select a Shift Category and Facility and do not see a Profile you expect, check your Patient Assign settings to see what Shift Category the Profile currently uses.
Important: While you can change the Global Shift Category for a Profile, there are many things you should consider before you do so. See Configuring Patient Assign Settings for more information.
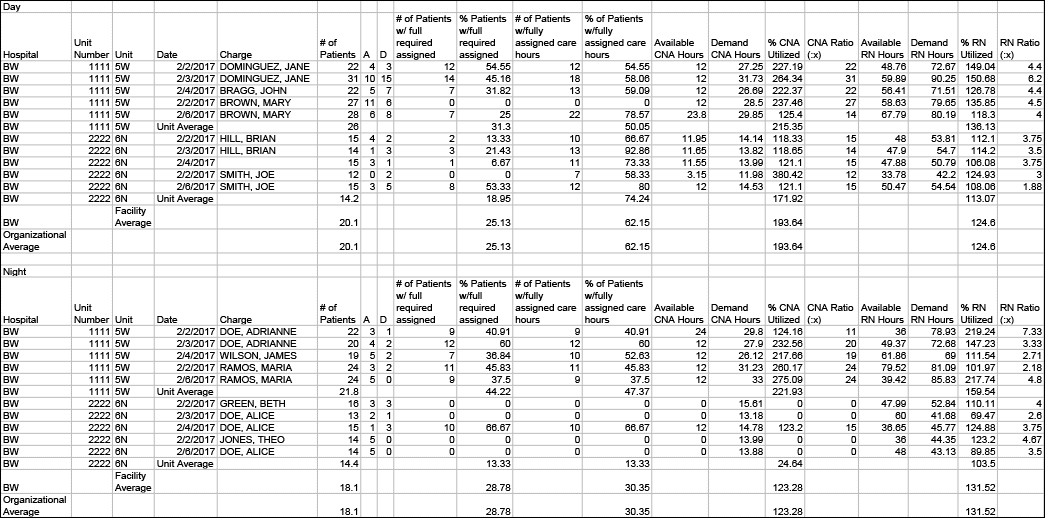
The report displays a group of rows for each Shift Partition within the selected Shift Category. Within the group are individual rows for each day within the report date range per Profile selected. Subtotal rows display averages for each Unit (Profile), Facility, and Organization for the entire date range.
This report displays the following information.
The next four columns are repeated for each Global Skill included in the report:
Notice that the Organizational Average is not an average of all facility averages included in the report. Instead, the report averages all profile averages within the report in order to provide a more accurate average for an organization. For example, if the report included 3 profiles in one facility and 60 profiles in another facility, using each Facility Average as half of the equation would not give you a true Organization Average.
The time when you run this report affects the data the report includes. The best practice is to create patient assignments prior to the shift start time. If your organization has set policies for when you should finalize initial assignments, the best practice may be to generate this report for the current day shortly after that deadline.
There are two reasons why patient assignments may appear to be incomplete when you run the report:
Consider these factors when reviewing the report to determine compliance with your organizational best practices for patient assignments.
The goal of this report is to clearly identify when patients have not been fully assigned to appropriate caregivers to satisfy their required skill and role assignments and full demand hours. The calculations are straightforward, therefore, because no credit is given for partial assignments.
For example, assume Luis Turner is a patient on a profile where RN is a required role and patients have demand hours for caregivers with RN skill. Luis specifically has a demand of 6.04 hours of RN care that needs to be delivered over the 12-hour Day Shift. The table below displays how the report would count Luis based on different assignments.
| Assignment
Times in bold indicate a deviation from the full shift time. |
Full Required Assignment | Fully Assigned Care Hours |
| One RN from 0700 to 1900 consuming 0 care hours | 1 | 0 |
| One RN from 0700 to 1900 consuming 6.04 care hours |
1 | 1 |
| One RN from 0700 to 1900 consuming 5 care hours |
1 | 0 All care hours must be met in order to count as fully assigned. |
| One RN from 0700 to 1840 consuming 6.04 care hours |
0 Required caregiver must be assigned for the entire shift in order to count as fully required. |
1 |
Note that you may need to enlarge the columns in your CSV editor in order to see complete column headings and data.
